Steeping the Grains
 Steeping grains is exactly what it sounds like--you get a bag, stick some grains in it, and stick them in hot water much like you would tea or coffee. This step gives the finished beer more flavor and complexity, or so say the gurus of homebrewing that I listen to. I may in fact try to do an all-extract beer just to find out if it's true or not.
 I'm not cool enough to do all-grain brewing but that's an awful lot more involved and I'm both broke and lazy.
Adding Extract
 So this would be the lazy step--I get all the malt extract sugary goodness without mashing or needing weird sounding tools like "lauter tuns". If it looks like a syrup, that's probably not a coincidence since it is a syrup--not that I'd stick it on my pancakes.
 The other bonus about using malt extract is that you don't have to worry about screwing it up and not getting enough fermentable sugars in the solution (brewers call this a "wort"). Believe me, if there were a way to screw up using malt extract, I'm certain I'd find it.
Hops
 I am the first to admit that I had no clue what "hops" were before I started brewing. I am also the first to admit that prior to brewing, I was blissfully unaware of how completely and unbelievably nauseating their smell is. Seriously, I can't remember the last time a smell so wretched came out of my kitchen. See, I'm used to cooking where you take a buncha stuff that's probably pretty good by themselves and stick them together in a way that is cool. Typically, you don't go more than a few minutes without something that seems good to eat. Hops, on the other hand, take weeks to get the edge off at which point it's a good balance between the malty sweetness that you'd be left with otherwise. It's still sort of mystifying and exciting to me that you take this liquid...stuff...and stick it all by itself with some yeast to munch on it and you end up with something as awesome as beer.
 Cooling the Wort
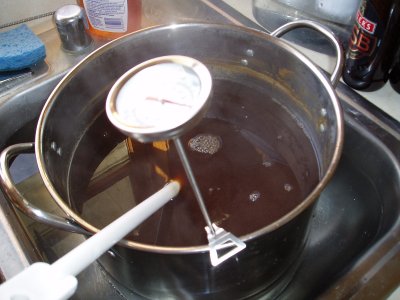 Next, to avoid yeasticide, you need to chill your wort to a reasonable temperature. I was able to take this pot of about 2.5 gallons from 209 degrees where it was at a rolling boil to about 80 degrees in about 20-25 minutes in the sink. This is not to say that it's either easy or fun but I haven't dumped the $40 on a wort chiller that hooks up to the sink yet (I may actually build one if I get crazier). A proper wort chiller is sposed to work in 8-10 minutes so really, other than the extreme inconvenience of sink-chilling, I don't see a huge need.
For those out in the "Real World" who might be trying this at home, here are two tips that will make this far easier for you: 1) keep the wort moving in the pot, and 2) keep the water moving in the sink. I cheated though and used bottled water to top off the wort which I cleverly fridged beforehand hovering around 30 degrees which brought the entire thing down to just under 65 degrees all told. Hopefully bottled water doesn't have any nasties.
Primary Fermentation
 This would be the first stage of waiting, typically one week as the yeast do their crazy thing. I opted for the plastic bottle this time instead of the plastic bucket because I've been reading posts about how cool it is to watch yeast work. I have no idea what they're talking about. I can't see anything in there through the murk and I wrap the bottle in a towel most of the time anyway to keep the light out. I'm probably going to go back to the bucket next try since it's far more convenient to move.
Astute readers might wonder why the bottle is only partially full. The bottle therein is a 6 gallon bottle and most batches of beer are only 5 gallons. In this phase, if the yeast are particularly lively, the foam head can apparently be quite large and it'll spew all over the place through the bubbler on top. Also not helping matters, because my last beer was on the weak side, I opted to only go with 4.5 or so gallons instead of 5 to increase the alcohol content (same amount of fermentables...less water...seems good to me).
One more thing...
 Five gallons of beer requires around 50 12oz bottles. Most people (myself included) don't really think about bottles much.
 Welp, it's a dirty job, but someone's got to do it.
Yeah, you can buy bottles at $10 for a set of 24. At $35 for a set of 24 with BEER in them...well...you figure it out.
The chili gods are restless
 I ran out of chile powder about a month ago. I make my own. These would be chile shreds in preparation for cooking, roughly 100 pods worth of various types. It takes some effort, some dedication, and more than a little bit of pain but it appeases the chili gods.
 In fact, they're looking for worshippers now. I, their humble servant, best not keep them waiting.
No comments:
Post a Comment