2020/11/08

A thing a week 2020, week 45

More minis this week and probably for the majority of the remainder of the year.  Gotta get through that pile, of shamepotential, yo.  This week we've got speed paints and almost in a theme:  "stuff that's easy to paint."  So there's that.

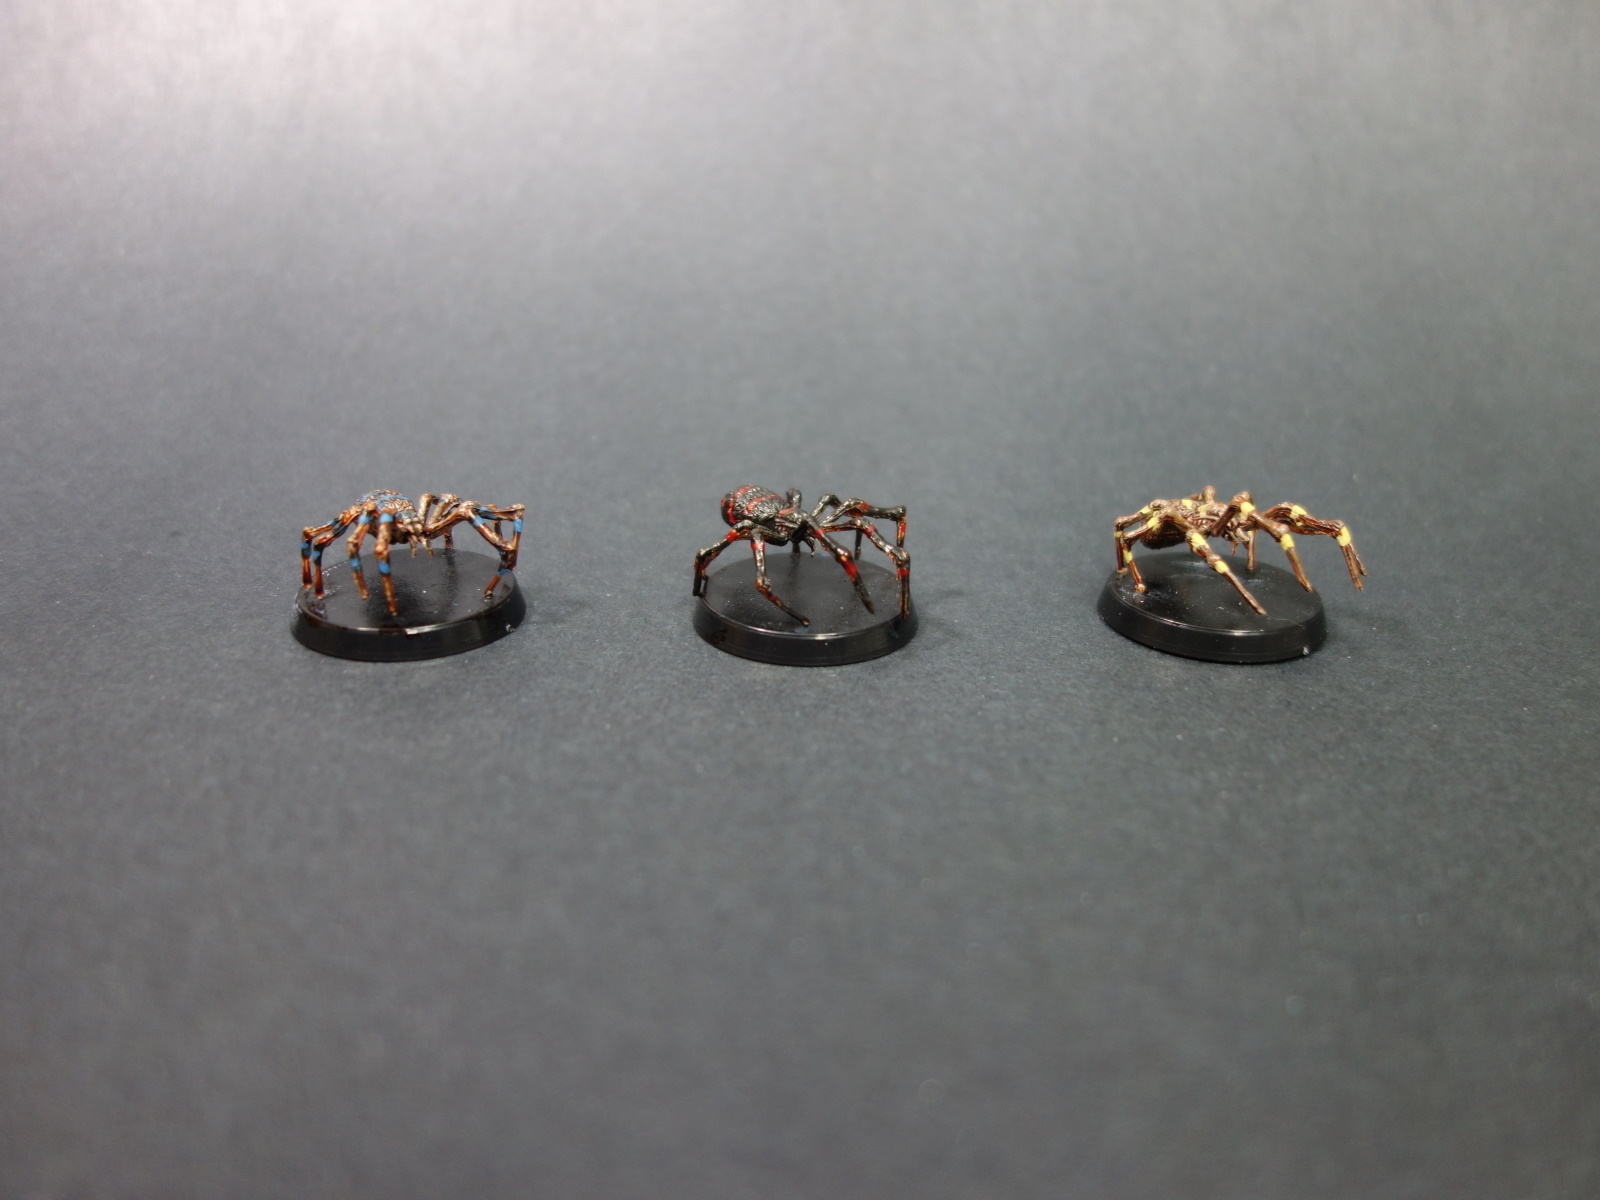
Here are three Nolzur's Marvelous Unpainted Miniatures:  W1 Spiders and they are terrible.  I've talkedwritten quite a lot about my growing disapproval of the Nolzur's line.  This is particularly due to the difficulty in painting and the lousy mold lines.  For these figs there's also their spindly-ness and resulting difficulty in gluing them to their bases.  I have no idea how they expected these guys to fit on the supplied 1" bases.  I based them on 35mm bases and they barely fit.  The colored banding was painted first with a candy coat of Badger Minitaire Ghost Tint Brown which was followed with a Vallejo Dark Grey Wash, and no I don't get kickbacks for these.  I opened the blister containing these creepies years ago and they were such a pain I stuck them back in and in a pile but they're as done as they're likely to get now.

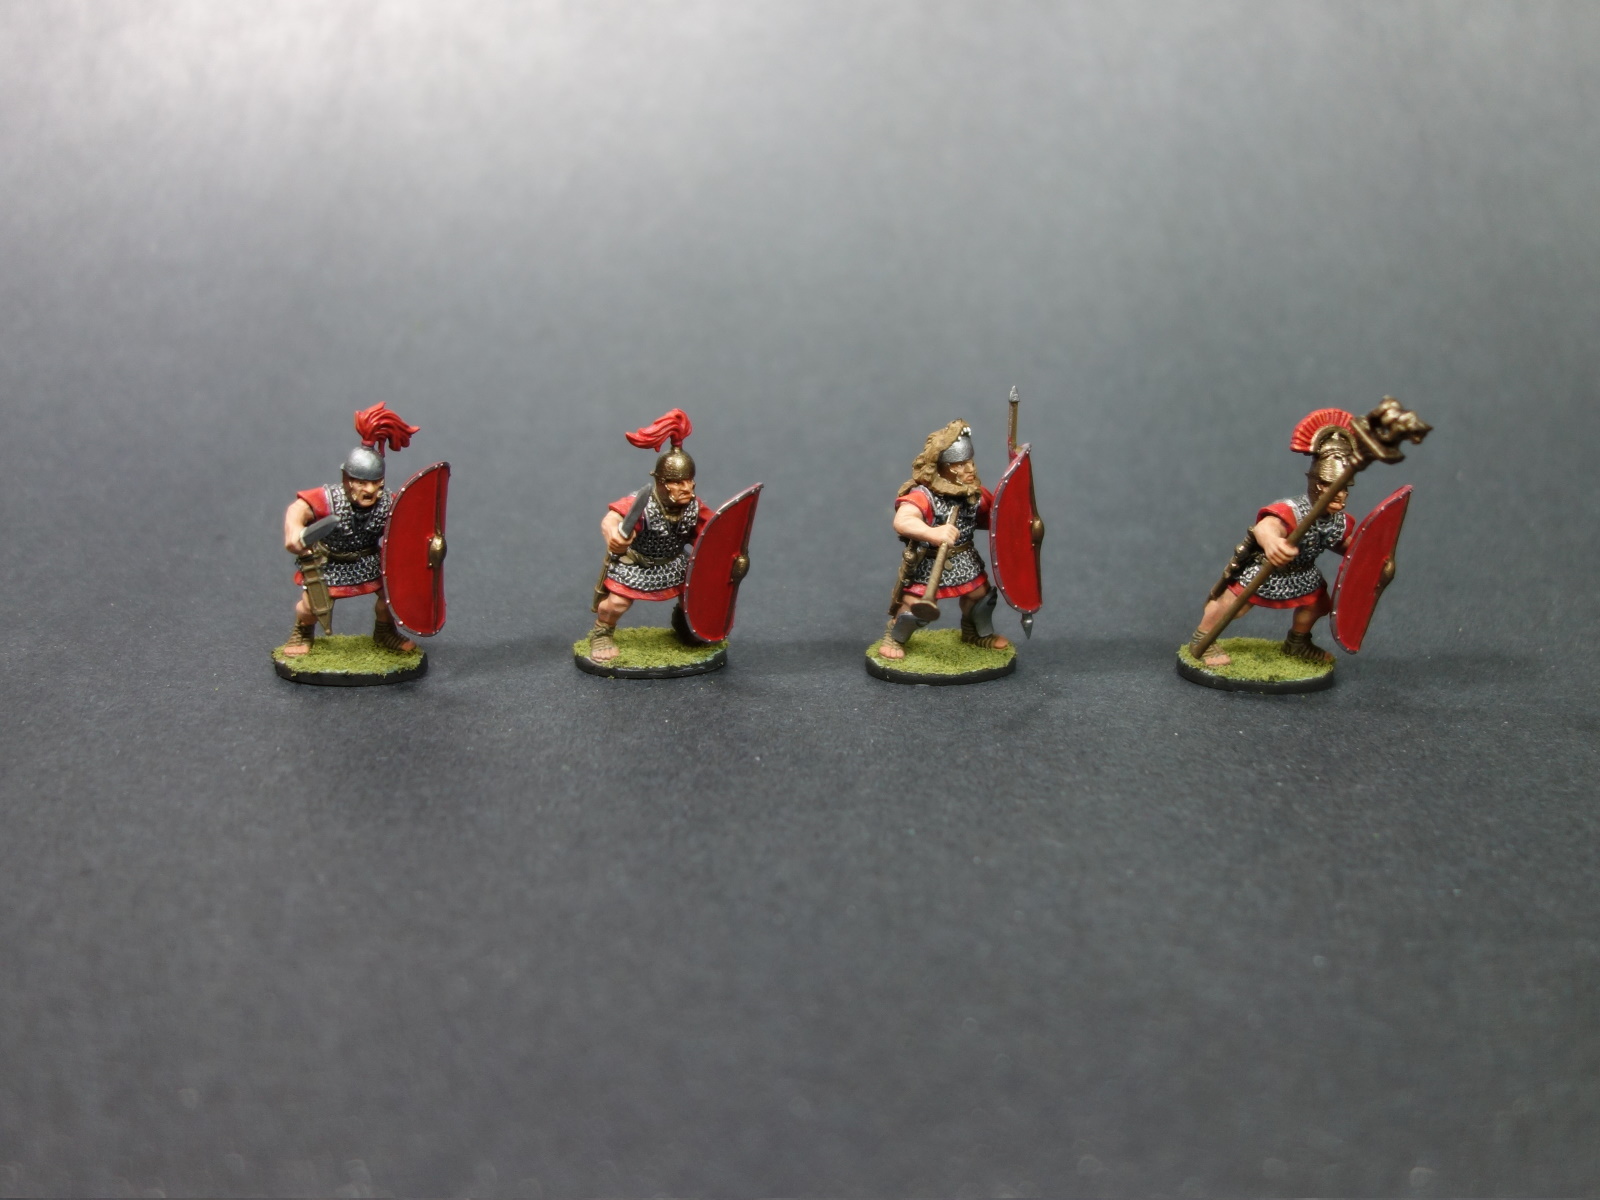
These four are a Hail Caesar Caesar's Legions Command Sprue since renamed.  I'm pretty sure these guys were built improperly.  I mean, one guy has two swords for crying out loud.  Beyond that, they're painted very simply as glazes over a zenithal+anti-zenithal.  The shields were painted separately and glued after the fact and I wish I'd paid more attention on how they attached so I would have painted the backs of them better.  The whole batch (these four plus the next two) were painted over two-ish days to the tune of about six hours total including assembly.

These two are the crew of Imperial Romans:  Plastic Scorpion which I bought mostly for the scorpion.  I had a need for ballista, these guys were on sale, and I was already buying stuff.  Subsequently I bought 4x Reaper Ballista which fit the bill a little better featured way back in Week 36.  The scorpion itself has been based but has yet to be painted so expect that at some point in the unforseeable future.  These guys were part of the previous batch's six-ish hours and they'll be based with their equipment.  Watch this space!

This is a cart from Reaper Bones 4 kickstarter and I can't find a real link on their site.  It's been partly done on my workbench for many weeks and at one point I had the right colors out so I finished it.  I didn't put a ton of effort into it which probably shows.  Once I'd finished I started thinking through Bones 4 and I don't recall having any spare horses or other beasts of burden in there.  Reviewing the core set, this cart is pulled by a pig!  The pig has been located and will show up here at some point.  More lazy painting.  Hooray!

2020 finished mini counter:  157


2020/11/01

A thing a week 2020, week 44

As discussed for the last few posts, several weeks ago I broke down and bought a 3D printer.  It was round three or four of my roughly eight month cycle of "wow, that'd be fun to build stuff with" and "I have too many hobbies and stuff already."  I knew I would eventually break down but it seemed like most of the hobbying media I consume started talking about how awesome resin printers were right around the beginning of the summer.  I suppose I'd already lost that fight. I've got some pretty lofty goals for it which is going to require me to do some 3d modeling and I've got to say that I'm finding Blender to be an awful, unintuitive beast of a thing.

3D printing is its own hobby and has its own learning curve and despite the fact that most of the goods are digital, they can still be super spendy.  The seven skellingtons are a free set that mostly printed correctly.  Properly supporting figures is an art form and one I'm not good at.  Luckily, these guys came pre-supported but were a goddamn pain to de-support after the fact which is evidenced by the fact that many of them still have some of the supports still attached.   I hid these ineffectively as spearpoints sticking in the skellington.  They're a speed paint as one might expect (I mean, they're skeletons, what do you want?) and I think they look OK.  

The bases are Green Stuff World texture rollers over Extra Firm Super Sculpey with some sand stuck to the base.  I was going for a "dark temple floor with faintly glowing red runes" which, I dunno, almost sells.  I could have sold it more with some OSL but I wasn't super interested in doing that for these guys though I certainly could have.  Base coat was skeleton bone and washed with home-made wash adulterated with matte medium and made forever ago for terrain.  Overall, including basing which happened over several days (glue takes time to dry, yo) these were done in right around six hours total which is about how long they took to print.

You might also notice a lighter background in these shots. I'm trying (unsuccessfully) to improve the shoots here and picked up a bigger piece of supposedly-black poster board. I might print a cradle for the camera to avoid my awful shaky-cam shots. The small dollar store tripods I've been using are a little too tall, still, and I've got more work to do to sort out my lighting.

2020 finished mini counter:  147/50

2020/10/25

A thing a week 2020, week 43

I've now had my 3D printer for a couple weeks, this one, if you're curious.  As a result I've been spending quite a lot of time trying to make it work which I'm sure I'll talkwrite more about sometime later.  What better time for some lazy painting?

These two are a pair of Pike & Shotte Landsnecht Command Frames.  They were painted mostly with an airbrush as they are mostly covered in plate armor.  I'm pretty sure I bought these on sale at the end of last year.  I bought two of them and I suspect that if I'd realized they were a single character per frame I wouldn't have bought them as they're over my typical $4 per fig limit.  They got primed, shot from below with a mix of dark blue and dark metal, Vallejo Metal Color Steel from 90 degrees, and a brighter color from the top.  Details were picked out with a bronze-y highlights from back in Week 40 painting hoplites and everything covered with a gloss wash.  Overall, less than an hour for both and I like the results despite my less-than-even spraying.  

These two are from the Perry Miniatures War of the Roses:  Infantry (1455-1487) (since then, rebranded).  This is a set of 40 figures only four of which are fully-armored men at arms--when I bought them I thought they were all full plate figures.  At an extremely affordable less-than-one-dollar per fig, they make up for my Landsnecht Command Frames above.  They were painted pretty much in the same scheme above at the same time, even.  The bases are rolled-out Extra Firm Sculpey rolled out with a Green Stuff World texture roller (this one, I think). They're glued to a normal 25mm base with some coarse sand and painted with washes to dirty them up.  I was going for a busted up temple floor thing which worked OK.  Ironically, I spent more time on the bases than painting the figs.  

In keeping with the lazy painting scheme, these are two are Reaper Bones Caryatid Columns and a single Reaper Bones Gravestone of Protection.  I use golems like these quite a lot in my games so I was pretty excited to paint these.  I use a fairly predictable recipe for stone.  Prime + dark wash + drybrush + lighter drybrush--lazy painting at its finest.  I didn't even get the opportunity to base them reasonably because I quite like their built-in bases.  Total expenditure:  less than an hour for all three including prep. 

I sometimes don't count terrain toward my figure goals but this one is for sure going to be counted.  When I got my 3D printer I tried to print the test model that came with the device...which failed.  I also made a giant mess trying to clean stuff up.  So it wasn't a particularly auspicious beginning to my 3D printing.  I was pretty sure I'd messed something up until I started reading stuff online and it turns out that there's something wrong with the test model.  The next print I tried was this guy which printed perfectly.  In fact, every subsequent print has been good minus stuff I screwed up.  So this is officially my first successful 3D print which is now painted.

2020 finished mini counter:  140/50

2020/10/18

A thing a week 2020, week 42

I've been trying to justify buying a 3d printer.  This is a fairly useless effort because I know that I'm going to buy one anyway, but it didn't stop me from cataloging my minis in near totality.  I've excluded my Star Fleet Battles figs for...reasons.  For fun, I also added counts for all of the unfulfilled kikckstarters I've backed.  What I'd hoped is that I'd come out with a "mostly done" kind of number.  I don't know why I thought that.  What I got was a big number completely dwarfed by an even bigger number.  Turns out I'm just over 20% though a pile of shamepotential of close to 1600 figs.  So I got that goin' for me.  

Because my backlog is so large and the pile of boxes is becoming difficult to step over, I decided to work through some of the partially-done boxes that are taking up space.  These are the final 12 Viking Bondi that we saw earlier this year completing the set of 32.  With the other 16 guys of the exact same molds named Saxon Fyrd Warriors, I have a veritable army of these guys. 

Instead of building what seemed fun, I took stock of the existing guys to see where more representation was warranted.  That ended up being some bowmen, some dual wielders, and a few dudes with warhorns that I don't have rules for (yet).  One of the archers ended up with a bow kitbashed from elsewhere because I was short one.  He shouldn't be hard to spot.  The weird poses were because there was a distinct shortage of left arms that could take a weapon.  The color scheme was basically "what would look OK that isn't already represented" which translated to "teal, purple, and golden brown delicious" so if they look a little garish, that's why.  I also used a couple new Pro Acryl metallics to see if they're any good and the nicest thing I can say is that they're not as good as Vallejo Metal Colors--accept no substitutes.  

These were based in place prior to painting and done as a batch over several days.  I recorded the building time for these guys and I was surprised to find it was around 4 for the dozen of them.  I wouldn't have guessed I spent this long building and scraping mold lines, especially given how lousy a job I did of both.  While the last batch of 20 seemed very tedious indeed, these seemed a lot less so and didn't take nearly as long per fig despite being done to a higher quality.  No fancy tricks here, really, just another batch paint on the heels of last weeks' Stark Sworn Swords running around 21 hours from clipping the first parts off the sprue to the end of painting.  I think these are fine overall for a speed paint and I'm happy to complete the box.

2020 finished mini counter:  132/50

2020/10/11

A thing a week 2020, week 41

Minis again this week.  These guys have been done for a while but I'm pushing a bow wave like I like because I'm still expecting some leaner hobbying times in the medium term.  

These 13 doods are from CMON's A Song of Ice And Fire Tabletop Miniature Wargame.  More specifically, they're Stark Sworn Swords which would mean a lot more to me if I knew anything about Game of Thrones.  ASOAIF is a rank and flank wargame, notably one I don't play, but these guys and another few dozen of their closest pals were on super discount last year so I own quite a lot of them.  

These particular guy are in five poses, with the common soldiers in batches of 3 and 4.  They come attached to a 35mm (or so) base and while James Wappel recommended using a razor saw to cut them off at the feet, I clipped the little nubbies on the bottom of the base and then brute forced them off which to me seemed a little easier if less civilized.  They were pinned through one foot and laboriously cleaned of most of their mold lines.  

Like #1:  they're fairly simple and easy to paint except for the many, many straps.  I went a little overboard with my color counts and they were still pretty straightforward.  Like #2:  they're well-sculpted and made of fairly stiff plastic.  I guess I'm too used to bendy Bones figs.  Dislike #1:  they're clearly not designed for painting--way too many of their features are hidden.  I don't like having to do brush calisthenics to paint stuff but at least when it's due to my assembly ineptitude, I can only be mad at myself.  Dislike #2:  They're way too tall, about 35mm which makes them tower over my other figs, some of which are true 25mm.  This probably won't prevent me from using them in play, but dang it makes them look out of place.

Overall the lot of them were done in a speed paint batch in around seventeen hours including prep, paint, and basing.  I feel like they're at an acceptably quality and hope that they'll find use despite their scale issues whenever we get to play in person again.

2020 finished mini counter:  120/50

2020/10/04

A thing a week 2020, week 40

More minis this week as one might expect since that's most of what I've done this year.  These guys were done about a week and a half ago.  Given that it's October with a lot of 2020 left and another big batch already completed, I suspect I'll crest 125 painted figs this year.  Only one way to find out!

These eight beefy fellows are Greek Hoplites from a single sprue from Warlord, my favorite place in Englandland to buy figs from.  I documented my Phalangites last week painted in red so I didn't want to do that again.  So this time around I opted for blue and green.  In retrospect the green makes them look a little too Sparty-like.  I had the thought that I'd glaze these guys like I'd started with so very long agoPro Acryl transparents probably would have worked better if I'd worked more to bring up the highlights of the value sketch more or watered it down more.  In actuality I had to re-add the highlights anyway.  

The fleshtones were normal layering with Army Painter paints that I'm desperately trying to run out of covered by Army Painter flesh wash.  Their teeny-tiny-hidden-behind-their-shields eyes were especially painful though the poses are all my fault.  The bronze armor is Vallejo Metal Color gold and copper 3:1 tinted by Badger Ghost Tint Golden Yellow so they'd match their Macedonian neighbors.  This sounds pretty complicated but it really isn't.  I was too heavy with the candy coating on a couple of their shields because I was in a hurry and not being super careful.  

These dudes were glued to thin bases and magnetized like everything else.  Coarse sand was glued down with PVA very poorly and then primed and painted with the fig.  Flocking arrived after painting.  Prep on these guys wasn't great and I missed quite a lot of mold lines that I was too lazy to deal with during painting.  Their poses which I'm pretty pleased with also made painting really inconvenient but I knew that going in.  All told, I think these guys are OK for a speed paint and the lot of them were done in about 12 hours including prep and assembly.  

2020 finished mini counter:  107/50

2020/09/27

A thing a week 2020, week 39

This week we're somewhat predictably back to minis.  This week's offering was actually done a couple weeks ago but I'm guarding against an expected time crunch sometime in the medium term.  Spoiler:  I've already broken the 100 painted figs mark this year and might break 125 if I'm diligent, so I got that goin' for me.

These four dudes are Macedonian Phalangites purchased as a single sprue--you know, the dudes who made up the bulk of Alexander the Great's army.  I chose to not glue their shields on to make them easier to paint and then never got around to prepping/painting/gluing the shields on at all.  This leaves them with a really big heavy strap over their left arm that doesn't seem to do anything.  These guys were supposed to have non metallic metal bronze for their armor but I changed my mind and did them as a speed paint instead.  The metallic is a mix of copper and gold Vallejo Metal Color and hit with a candy coat of Badger Ghost Tint Golden Yellow which really warms up the hue.  This is my go-to metallic bronze and one I like a lot.  These dudes were done in around four hours total over several days.  Like these dudes?  Tune in next week for more bronze age Greek action!

These are Greek Hoplite command guy and dual flutist.  I'm sure there's some historical reason that they come this way but I couldn't tell you what it is.  As the phalangites were painted in bronze and reds, I did these in bronze (well, the armored dude anyway) and reds too.  I'm not super keen on these sculpts.  The warrior's sword arm looks odd and my speedy paint job didn't help at all.  The dual flutist's arms are very...indistinct.  I didn't bother cutting them off their molded bases and leaned into the flock as a result.  I didn't feel fancy enough to put any freehand on his shield.  I may revisit that at a later date.  The two of them were maybe three hours total of speed painting action overlapping with the phalangites.  


This is Bril Le Ante, Hero of Light otherwise known as 01-407 from Ral Partha to schoolchildren far and wide.  He's another one of my vintage figs and is interesting because he came both on foot and on horseback.  He was mostly airbrushed, at least for the metal bits which make up most of his detail--lazy painting at its finest.  The bronze accents are the same as the Macedonians above.  The cape, face, and plume were brush painted.  He also marks my first very feeble attempt at freehand with the chevron but hey, you gotta start somewhere.  His tiny, tiny eyes were a point of significant pain.  Overall despite issues blending the cloak, he was done in a couple hours.


These two are Nolzur's Tabaxi Rogue painted as cheetahs.  My game as a couple feline races with these markings so when I found out that Nolzur's made Tabaxi figures, I knew I had to get some.  Like many figs from this line, the mold lines are awful.  One of them got counter-shaded with the airbrush, the other didn't but was cut off his broccoli base.  Both of them suffered from the non-stick effect of Pro Acryl Transparents thinned down way too much which helped nothing.  There were parts on these two that were very hard to reach and a lot of the details were muddy.  The guy with the sword and straight dagger got some screen time as a PC last year until the player moved to Australia.  He also got one of my fancy bases.  These two were a speed paint to the tune of about four hours for both of them over several days, a considerable chunk of which was painting their spots.  I think they look OK.  I might have put more effort into them if they had been a little friendlier to paint.

2020 finished mini counter:  99/50

2020/09/20

A thing a week 2020, week 38

It's hard to follow last week with anything especially given the effort and buildup involved so here goes nothin'. Youtube says that my last video was posted on October 13th of last year, somewhat appropriately How to end your campaign which means that this week's offering (actually posted last Sunday) arrives less than a year from the last. So I got that goin' for me. I also wrote these two articles about mini painting which seems appropriate.

The video was a long time in the making. I'd written the original script somewhere in June and refined its content over the next couple months. I've been trying to record this one for a really long time but never made time to actually do so. I'm out of the habit but if I'm going to make more (and I'd sure like to) I need to streamline the process by quite a lot. I didn't move my monitor and chair around and I didn't do terribly much shifting around of my shots for comedicdramatic purposes. I'm not 100% sure that this kind of crap ever helped but a talking head told me to so what do I know. I'm hoping I can get back on the horse, maybe every month moving forward but let's not get ahead of ourselves.

The articles are a different story. I was looking for a thing I could do half-drunk which I often am after I've done my hobbying for the evening. Remember that I'm stockpiling Scotch corks. Writing works for me because I can continue to refine it when I'm soberless drunk. I figured it was time to follow up my non-award winning series started way back here in August of 2018.  I'll probably write more about mini painting, possibly as the year turns over and some day I'd like to write a beginner's guide for all the people who will probably never read this crap.

2020/09/16

Adventures in Miniature Painting #6

This is the continuation of last post since it was far too big to reasonably fit into a single article.  My excess can now fuel my post count so I got that goin' for me.  Last episode is here.  The whole thing kicks off way back in 2018.  If I'm smart and not lazy I'll put hotlinks over on the right.  


Paint Obsession

I have bought a lot of paints over the years.  In this era (starting in the summer of 2018) I have bought the Army Painter Starter Set, various Vallejo Game Color and Game Air droppers, several Citadel Washes colloquially known as liquid talent, Badger Minitaire Ghost Tints and 12-color starter set, Base and expansions 1, 2, and 3 of the Pro Acryl line, several Vallejo Metal Color droppers, and one of the cheap-ish starter kits of Winsor and Newton Winton Oils.  If you're keeping track, that's many hundreds of shekels of paint.  If you add it all up it seems like overkill, probably because it is, but it's super easy to fall into the trap of needing every cool new thing that your favorite talking heads like on the youtubes.  I haven't bought any heavy body acrylics, Scale 75, Warcolours, or other esoteric types but if history is any indication, I suspect I will some day.

And if you're wondering if this is not in fact overkill, I say nay.  I have now painted a paltry several hundred miniatures (around 300 at best estimation) and I have yet to exhausted a single dropper, pot, or otherwise container of mini paint. Heck, I've only killed a few bottles of craft paint for all the stinkin' buildings and terrain I've made over the years.  I will be burning through several droppers of my Army Painter set solely so I don't waste them by using them to paint my ever-so-pretty Dungeons and Lasers kickstarter terrain.  Mostly with a drybrush.  This one, if you're wondering.  So, yes, in conclusion, I have a stupid amount of paint that I may never run out of even if I paint the remainder of my many-hundreds-strong pile of shame which grows by the quarter.  

Color Theory

When I started I was afraid of mixing my own colors like I imagine a lot of folks are.  How the heck do you match the colors that you used last time?!?  Mixing your own colors is so terribly imprecise and messy.  There was also a ton of figuring out which colors of which lines would cover/glaze/filter/wash/etc and how they behaved as such.  So, like a lot of folks, I bought a lot of paints and tried a lot of stuff.  Now I know that I don't need all of these paints even though I like many of them, my favorites still being Pro Acryl and Vallejo Metal Colors by a long shot.

Turns out, with a little bit of practice not only can you match any color you choose, you can also control the hue and saturation of the paints you're sticking on your figure.  I was already (finally) learning about color theory for compositional purposes but actually mixing my own colors really drove it home.  As has been well documented here before, I suck at at colors, but perhaps slightly less now.  More pertinently to this post, I stopped needing so many paints which freed my palette and the seemingly endless cycle of shaking, dispensing, and being sad about the level of emulsion achieved...which leads us to oils.


Oils 

This year there's been a fairly large boom of folks using oil paints on minis.  This includes Vince, James, and Marco among others.  Having completed several figures in oils, I understand.  My acrylic blends are crap--I'm not good at it and it takes a lot of time and patience, neither of which I have in abundance.  I do like both void blending (wet brush with no paint feathering out a wet edge of paint on the model) and wet blending (blending a new color with wet paint already on your model).  Both of these are the default with oils and they remain workable for hours if not days.  As a hobby painter at best with a more-than-full-time job, this means I don't have to finish a thing in 5 minutes if I want that sweet, sweet, blending action.  And before you say anything, yes, I know about acrylic retarder medium.

I like the idea that mini painting is evolving past the dogmatic "thou must use GW acrylics and start with two thin coats and a wash" world because I'm a dirty heathen not educated in The Ways(TM).   I'm also  pretty sure someone else has said this but working with oils makes me feel an appreciation for Bob Ross, Pablo Picasso, and the great master painters of antiquity.  I suppose I can now claim being a multiple-media artist (yes, I made that term up) working in acrylics, oils, foam, graphite, pixels, code, and Lego.  That and a $5 bill will get me a coffee.  

I needed the education with acrylics and all of the experience I've picked up over the last thirty-ish months to get to this point.  If I'd started with oils, their fiddlyness would have been a paint tube too far--forget the pain of pre-thinning them and stuffing them into droppers.  I got into wet blending late, basically the end of last year.  More importantly, I like wet blending which is why it shows up in so many of my notes.  I also needed to be comfortable with mixing my own colors which only really arrived in the middle of this year doing shaded basecoat work with Pro Acryl Trasparents.  It was a perfect storm and I arrived at oils at exactly the right time to both appreciate and enjoy working with them.  Your mileage may vary but just about every time I'm painting with acrylics I ask myself "why am I not painting this in oils?"


Hate Painting

It's easy for painting to feel like a thing we have to do more than a thing we want to do especially as a beginner looking at a vast pile of white and grey plastic.  I got into painting because I felt it was something I was expected to do as a gamer and GM and whatnot.  This is ironic because I avoided big chunks of terrain building or years because I didn't want to get involved in painting.  I've always played with unpainted figs, some of which I'd bought in the 90s.  It was true in Battletech, various incarnations of DnD, and even my own games.  

In the two and a half-ish years I've been doing this, I've watched the quality of my work increase for the time spent painting.  I don't take every model as high as I can go--I'm not even sure where that limit is anymore and I don't expect to find it this year.  Not every model needs or even wants that, but doing a lot of batch painting over the last few years has given me some understanding of which corners I can cut for maximum benefit.  For those who don't regularly batch paint or take a fig toward the far end of their ability, both of those have taught me different things which I feel are necessary parts of my deliberate practice.  

I don't know why it changed this year but it did.  I still don't enjoy all of the hobby but I enjoy enough of it now that motivation generally isn't a problem.  Being cooped up in my house for months this year might have helped that, for what it's worth.  Knowing that I can crank out a finished fig in a day is powerful, especially when I have games to run and want nice characters to put on the field.  At this point I rarely buy figs I need to fill a role (player characters are notable exceptions) and buy more for how fun I think they'll be to paint. 

So there we are:  roughly a year and a half of leveling up in a thing I'm trying to learn.  Hopefully I'll be able to add another volume in this series in a bit.  Watch this space!

2020/09/15

Adventures in Miniature Painting #5

Installment #4 was way back in February of 2019 so I figured it was time for an update (if you want to go all the way back to the beginning, installment #1 is way back here in 2018).  So, what have I learned in the last eighteen-ish months?  As it turns out, quite a lot!  So much so, in fact, that I've had to split this into two installments.  Coming soon!

Basing Is Not Overrated

I made a real big basing push this year.  I talked about it here following an effort of several weeks over the totality of the minis I'd painted to date.  I'd resisted basing until then.  That's not "I based a few things but mostly didn't"; I'd literally based none of my figures and couldn't even be bothered to black-ring them because it was all scary and new and mystifying.  James Wappel educated me about this among other things.  

Since then, I've based every figure I've painted in some way, though, it bears noting that my bar is still pretty low.  For instance, I generally don't add crap to my vintage figures because I want to modify them as little as possible and suffice with painting the base black.  I also sometimes don't choose to base figs with sculpted bases or those that would be hard to cut off.  Everything else is fair game.  In fact, I look for figs that are easy to cut off of whatever they're standing on so I can do something fancier.  Notably, a large number of Bones 4 figures are not molded to their bases.  Win!

Basing isn't magic, nor is it particularly hard.  It does require a handful of specialized materials but they don't have to be super expensive.  Many of the best things tend to live at the hardware store which generally works in significantly larger volumes that we might use in the miniatures hobby.  That means it's inexpensive and/or can be easily pilfered from your local construction site.

Very fine sand can be purchased in way too big a bag at the hardware store or pilfered from your friendly neighborhood sandbox.  Sometimes beach sand can be fine enough but that requires a beach nearby.  Occasionally you can buy small bags of this from the dollar store but the stuff I bought is fairly coarse which is good for scale gravel fields.  Note that at typical miniature scale, even very fine sand is huge grit.  Baking soda sprinkled on superglue is way closer in scale, dries really fast, and is hard as a rock!  Thanks, Uncle Atom!

Small rocks can also be purchased from the dollar store or in much larger quantities from aquarium suppliers.  You could buy ballast from Woodland Scenics or something (I did) but a fine aggregate from (again) the hardware store is just as good.  I also understand that kitty litter works well, too, but I am not a cat person.  Alternatively, visit the nearest construction site and pilfer some of their cement grit.  Tree bark can make very convincing large layered stone.  Vince recommends these which are readily available 24x7 from Amazon.  I like these a lot because I don't have a friendly bark pile to pilfer from.  Note:  if you're going to take these from nature, make sure to kiln them in your oven to kill off any nasty beasties that might be hiding inside.  This will also reduce the probability that they rot due to internal moisture.

Flocking is not a thing you can pilfer easily.  You can make this stuff from sawdust or ground up foam or whatever but I recommend buying stuff from Woodland Scenics or something like that.  Seriously, a small amount of this will go a really long way and I currently own enough that I don't expect to ever run out.  You probably want two different colors because nature isn't monotone.  Clumps are good too to give some texture difference or to hide figs that didn't get cut off their molded bases but do what makes you happy.  Tufts are also things you can make yourself with a little skill and tend to be on the spendier side but a couple of those will really punch up a base.  Note that tufts are like salt--you want enough to turn up the volume but not so much to become overpowering.  


Hated Mold Lines

If there's a trend in my painting posts from this year, it's painting with oils.  If there are two then the other one is failing to deal with mold lines.  Mold lines, hated mold lines, are prominent in many of my posts, mostly because I habitually fail to deal with them sanely.  I've learned the hard way that mold lines will absolutely ruin an otherwise good paint job.  Reaper Bones are especially bad because the plastic is soft and tends to fray out and the normal white material hides imperfections terribly.  It also hides details and makes those details predictably soft which is why they're falling out of my favor.  The newer Bones Black material seems to be better in both regards.  

I agonize over mold lines now, significantly increasing my prep time but I'm at the point of not wanting to deal with them after the primer is on.  Nolzur's minis are lousy for this as they're already primed and in my experience, the mold lines are very pronounced and often badly placed.  Vince gives this guidance:  use acrylic gloss varnish over missed mold lines and paint over them.  I can confirm that this works over limited and shallow mold lines.  Anything bigger needs to be cut or sanded off.  

There's a reason that folks who have been doing this for a while shout about this one so much.  I've learned this the hard way and I now understand why.  Ultimately, they're your minis--do what you feel is appropriate but I'm going to wage a personal war on them moving forward.  


The Brush Cycle

In the last installment I waxed not particularly poetic about finally buying nice brushes.  I've now gone full circle.  It's not that I don't like nice brushes, but it's more that I don't need nice brushes for most things now.  Furthermore, there are a handful of things that carefully chosen crapsynthetic brushes are actually better suited to.

Washes love to soak up into the ferrule of your brush.  This is because their surface tensions is so low resulting in a much lower viscosity--exactly what we want so it'll flow into the recesses.  Paint drying in the ferrule is bad, however, and the most common way for brushes to split.  Large synthetics, say, these at less than 50 cents a brush, are inexpensive enough to handle all your washing needs.  Best yet?  When they inevitably do split or hook or whatever, graduate them to terrain or metallics or drybrushing or whatever you use your dead brushes for.  

If you've followed the typical guidance of using the biggest brush that you can stand, you've probably noticed like I have that natural hair brushes are typically floppy at that size.  This generally means that I have to work an awful lot harder to get the paint where I want it which is a friction that I just don't need in my life.  I generally note the opposite for small synthetic brushes--they're super stiff and painful to use a lot of the time, but more on that in a bit.  What if we use a really big synthetic brush instead of a natural hair brush?  Could that be the best of both worlds?!

The answer is yes!  Large synthetics are soft enough at scale to be usable for most of your heavy work like shaded basecoat (note the nice tips) and cheap enough to not worry too much about if you're rough with them.  I'm also a fan of fanning them out with paint in them in a very filbert-like way to do damp brushing across details a la James of Wappelville.  I wouldn't dream of abusing an expensive natural hair brush like this but with 50 cent synthetics I'm all about it.  

Have you ever had difficulty edge highlighting with your fancy Kolinsky Sables?  A tiny variance in the pressure will change the thickness of the line even if you've carefully wicked excess paint out of the brush and now you've got a lousy smear where you needed precision.  What happened?  Aren't Kolinskys supposed to be the best?  Edge highlighting would be trivial if you were using a pencil (say, these) since all you need is to get the tip where it needs to be and the rest is a snap because the pencils won't deform much under pressure. 

I find that synthetics are way better for edge highlighting small details because they're so much stiffer.  I was flummoxed about how hard it was to edge highlight with Kolinskys for months because I didn't have the brush control.  And don't waste your time with a tiny spotter.  Use a liner brush which has much longer bristles holding more paint and less likely to dry in the middle of your carefully applied stroke.  I also find them better for painting things requiring a lot of precision like eye highlights and whatnot for the same reason.  

I'm generally now using synthetic brushes for most of my work.  Flowing locks, freehand, and other very stroke-sensitive work is still done with the many (many) sables I've collected in the last two and change years.  Everything else is done with brushes that cost less than $1.  I abuse these terribly and will generally clean with abrasive soap where other chemical cleaners aren't doing it anymore and use them for glue and other terribleness on the regular.  At the price they are, they aren't super worth fretting over which has saved me a lot of hobby time.

Join me in the next installment where I'll talk about paints, color theory and haaaaaaate.

2020/09/13

A thing a week 2020, week 37

This week we have something fun.  I've been talkingwriting about a large project going on in the background for several weeks and it's finally complete.  I started way back in early May and this marks several firsts for me.  This is the first time I've worked in assemblies and pins, the first time I've painted marble, the first time I've used an oil wash, and would have been the first time I completed NMM if it weren't for Shadoweyes a few weeks ago but it's the finishing that counts.

It all started with a lot of prep and a couple of Whitemane Duelists from Wrath of Kings.  The mold lines on these particular figs were pretty awful and in some places there were defects that would eventually get a Green Stuff makeover.  As an example of how awful the mold lines are, both have mold lines going over their faces and there was a really bad one over one of their eyes.  Seriously, CMON, you can do better than that.  I have multiples of this set and at some point will buy more so hopefully other lots won't be quite so bad.

After many hours of scraping mold lines, I thought I'd done OK but I was wrong!  After priming it became super clear that I had a lot more work to do.  Priming was the typical zenithal highlighting that I did at that point.  These days I would have done an anti-zenithal of something from beneath; probably a reflection of the floor color.  In retrospect, I should have started with the Green Stuff instead of waiting till final assembly and probably more of the mold lines needed to be scraped off rather than having so many layers of gloss varnish over the top.

I'd started mounting them on corks glued to big chunks of foam but I got extra tired of the foam so ended up pulling them off and using 123 blocks to keep them upright.  That got old too, so eventually the corks got glued to the top of 1" rods as discussed way back in week 33.  In retrospect, all of this was obvious and I probably should have been smarter about it, a statement that echoes through this project.  The wine corks I've saved have been glued to 1" bases for this purpose moving forward and I've learned that Scotch corks can be used for the same purpose and have a built-in base already.  As I have a lot of empty Scotch bottles around (don't ask), I've now got a pile of these I can work with and yet another reason to drink a lot of Scotch--not that I need one.

I started with a shaded basecoat which is basically "get paint in roughly the right colors all over the model" and started blocking out the NMM.  This started with Pro Acryl clears and eventually moved on to other Pro Acryl colors.  If I haven't saidtyped it before, I'll saytype it now:  Pro Acryl are by far my favorite acrylic paints.  I'd wanted to have a different blue for their cloaks and shirts so went with the super saturated clear blue that I like so much but over the course of painting, I realized this was all one piece and should probably be the same color.  In the end, their pants, shirts, and cloaks ended up being the same colors even though they all started differently.  I think they're better for it as they have a more unified scheme but I painted most of these figs twice--a good indication that I should plan long projects better.

The NMM on the neutral posed gal worked out OK.  The desaturated highlight on her leg plates sells the shininess even if my darks aren't low enough.  The same part of the more dynamically posed fig is a mess.  I didn't want to put the highlight in the same place for...reasons.  I'd stated with them on the other side and re-painted them on the side they're on now.  In my head, she stands off to the other fig's right so the highlights line up like in the glamour shot at the bottom.  In actuality, it just looks wrong. This was not helped by initially botching her sword arm's armor.  I thought I knew how it was oriented but it doesn't actually orient that way and I didn't realize this until final assembly.  In fact, I think her arm isn't glued on properly because the sword point shouldn't be intersecting the standing plane.  I fixed this after the fact but it caused me much grief.

These figs are supposed to have white hair and they have a luxurious amount of it.  For folks who don't paint, white is an awful color to work with.  On top of often being chalky, you can't really highlight it since you're already at the brightest brights.  I went with a warm grey at a lighter shade than their fur and worked up from there.  About halfway through I hit them with a thinned down medium grey wash to bring the shadows down a bit.  Their size and the length of their flowing locks meant a lot of very long brush strokes--something I'm lousy at and I'm not sure their hair turned out very well.  I also missed out on the "Pantene Shine" highlights because they're already so bright.  I suppose I could have worked more lowlights in there but by that point I'd already hit serious fatigue for this project.  Next time around I'll pick a different, more dynamic hair color, and probably paint them in oils.

There are three major flaws in these two figures which I leave out of a) laziness, and b) a stark reminder that I need to be more careful.  First, the NMM on both figures sells but not super well.  The dynamically posed figure in particular would have been better with a higher-angle highlight rather than the lower off-to-the-left one I used.  This is especially true for their swords which are way too long to suffice with a single light to dark transition and the down sides don't sell the green marble reflection.  The last is the relative un-shininess of the bronze pieces.  As that was one of the last bits to be painted, I was seriously out of gas despite only working on these gals earlier in the day when I had more energy.  There are for sure other errors like my inattention to blending and the super-heavy buildup of paint texture, but those three are the big ones that stand out to me.

Overall, this was a huge learning experience and I'll do it again sometime in the medium term.  NMM is a lot less scary now than it was when I started and I'm taking the first steps down the path of understanding.  These took more blending than I'd ever done in acrylics and while I don't think I did well in that regard, I did better than my previous best attempts and feel like I'll get closer to the mark on the next serious attempt.  I love these figs despite their completely impractical armor and terrible boob plate--I can't help myself.  Despite the many mistakes and difficulties I'm satisfied with where they ended up.  They were done to the tune of about 50 hours for both which seems like a lot less effort than I actually put in.

2020 finished mini counter:  90/50, 7/5 at high quality 3/1 serious attempts at NMM


2020/09/06

A thing a week 2020, week 36

This week's offering is way behind of when the work was done.  I'm pushing a bow wave here which is how I like this to work.  This way I don't have to feel pressured if I'm not up to painting or building or am busy or have a bigger project running in the background like I have the last few weeks.

This guy is a Reaper Bones Dracolisk and a fig I've had around for quite a while.  He was a boss in a dungeon in my campaign way back in 2016 and he needed paint.  I painted him in oils in around 3.5 hours part of which overlapped with previous work.  I didn't blend every scale on him, but I blended quite a lot of them.  I probably should have raised the contrast on him but I kind of wanted to move on so I did.  I'm especially happy with how alien his eyes ended up being and how well the orange and purple color scheme worked out.

These three are Drow Duelists from the Legend of Drizzt Boardgame and the less said about them the better.  The mold lines are crap with one going across the face and chin. The sculpt isn't great and I didn't do a great job painting them.  These were always intended as a speed paint and it shows.  All told they're three-ish hours over a couple days but they're now the best color:  painted.

These are two packs of Nolzur's Marvelous Unpainted Miniatures Ballista.  The Golden Sun has two such items attached to its main deck so I figured I needed something to represent them.  I don't like these figures.  They're fiddly with weird details that don't make sense and seem to only tangentially resemble the things I want them to represent.  The skulls on the front are dumb and get in the way of proper aiming and the front shield thing is nonsensical.  I painted the trim around the front shield thing as metal which is what it seem to be sculpted as but this means that the limbs of the device are immobile--the mechanism can't fire!  I hate this kind of inattention to detail as much as I hate unrealistic armor.

On top of all that, these were a mess to work with.  Nolzur's claim to be primed but paint sometimes has a hard time sticking to it and the "primer" is on fairly thick.  I might be able to forgive these shortcomings except that it makes the already awful mold lines way worse.  I think every Nolzur's figure I've painted has had bad mold lines or mold issues or some other kind of sculpting shortcoming.  I might be done buying these if they weren't so reasonably priced and have sometimes exactly the figures I need.

2020 finished mini counter:  88/50


2020/08/30

A thing a week 2020, week 35

More minis this week, some of them done a while back to make space for said larger projects that I really need to finish.  Also this week was a return to oils which I'm liking more every time I use them.

This guy is a Reaper Bones Irontongue Priest who came with my Bones 4 order.  I think of him as an angry and heavily armed railway worker.  Marco Frisoni did a fantastic video where he used metallics mostly through an airbrush to get some awesome results.  I'm always looking for reason to use my airbrush more so I gave that a shot with him, his cronies, and another dude that should show up someday soon.  He was part of a speed paint as a batch of other dudes, two of whom were in last week's post.

The other dorfs are the similarly-themed Dark Dwarf SmiterDark Dwarf Pounder, and Dark Dwarf Cleaver.  If you're looking for the Dark Dwarf Striker, you'll have to wait because I missed him when I batch painted these guys.  Overall I think these paint schemes work but they were way more detailed than I thought they were when I pulled them out of my Pile 'o ShamePotential. Like our railway enthusiast, these were mostly painted with an airbrush and overall they were around 1.5 hours each.


These two terrifying creatures are Reaper Bones Giant Maggots also from Bones 4 and were speed painted in oils.  Given that these two didn't have a ton of details, I set out with two goals:  paint them with convincing countershading (even though it doesn't make sense) and really spend time on the blends.  These two were painted over about three and a half hours with some of that time using up some paint I had on other figures.  I could have spent more time on blends but I had other things to do that day.  I think they came out OK.

This last guy is a Reaper Bones Animunar Winterbeard, Wizard, you guessed it, from Bones 4 and speed painted with oils.  All told he was around three hours with some of that time spent on antoher figure that'll show up here at some point.  Also, I'm noticing a distinct speedup as I'm leveling up with this medium.  I love two painting techniques in this hobby that I'm sure I've mentioned elsewhere:  wet blending and void blending and I get both by default in oils.  For that matter, I can't turn them off even when they're inconvenient, so there's that.  For this guy I set out to really nail the blends and I think I got it.  He's also a limited palette treatment (mostly phthalo blue) a'la your friendly neighborhood Gandalf so getting a high contrast was important.  While I think I can get a result this good with acrylics, I suspect that I wouldn't have the patience to do so.

2020 finished mini counter:  80/50

2020/08/23

A thing a week 2020, week 34

This week we're back to minis and if you read last week's post, you know that I've been experimenting with oils.  I like learning new things and oils are both new and exciting.  Also, I got to buy new paints.  As a reminder, I am not a good painter but I am a big fan of wet blending and void blending and not such a big fan of doing a millionty ultra thin layers to build up a blend or effect or whatever.  Oils, then, seem right up my alley.

These are Reaper Bones Mal, Catfolk Warrior and Shadoweyes, Catfolk Rogue.  I love these figures and they were primed and zenithaled and ready to go without any other plans other than getting paint.  I painted him roughly as a Siberian Forest Cat and her as Tabby.  I also decided that even though she's supposed to be a rogue, that her armor was totally plate of some sort.  These are the first anythings I've ever painted with oils and they clocked in at around seven hours over two days.  If anyone's keeping score, I've now painted miniatures in enamels, acrylics, and oils and in two different centuries.  That and $5 will get me a coffee.  Mal at least, will show up again because I have a duplicate of him, I think in metal.  Watch this space!

I like a lot about painting with oils but like everything else, James Wappel makes it look easy.  It's not, at least not when you've got acrylic instincts.  I'll resist my urge to give an oil painting hot take here and paint a few more figs with them before giving more of my learnings but stay tuned, I'll get there someday.  Also of note, Shadoweyes' armor is painted in NMM which will count toward my 2020 challenge which completes it.  I should get a chievo or something for finishing early.

This gal is solo and one of two 11-010 Paladins who were my favorite minis for many years.  Her mate, sadly, is nowhere to be found.  I decided to go with a NMM TMM scheme because NMM still daunts me but I thought I could fake it with actual metallics to good effect.  Rather than doing a wash and highlight, I took it an extra couple steps going with cool greens in the shadows and whites in the highlights.  Some of it looks OK.  I spent a fairly long time on her face but I got to a place where I wasn't making forward progress so I stopped.  The rest of her is the standard fare and done in around four hours all told.  Notably, she was less detailed than both the rogues and clerics which is odd.

In the running for one of my oldest figures, the guy on the left is named catchily as 42-081d Frankish Command Set by Ral Partha.  I like this fig a lot because his armor is fairly historically accurate for the middle ages.  I painted him in the scheme that I vaguely remember the Swadian Man at Arms wore in the original Mount and Blade.  I was tempted to do freehand on the shield and took one very poor crack at it but eventually tiredness won out and I painted over it.  He was part of a batch paint of a bunch of figs over several days, his share being somewhere around 1.5 hours.

This guy is an elf though you wouldn't know it given his helm.  He is known far and wide as 12-050a and is usually found as part of a set.  I went with bronze because I mistook him for a Spartan or Trojan or something.  In retrospect the warhammer should have been a giveaway.  His armor is Vallejo Metal Color Gold with a Badger Ghost Tint Golden Yellow gloss coat over it.  There's a lot of undershading that didn't really come through but that's OK.  I didn't catch the mold lines early enough to deal with but otherwise I think the paint job was pretty good.

2020 finished mini counter:  73/50